Showing posts with label lists. Show all posts

It's all in the little things

Today, I was able to work from home and check some things off of my list of to-do's. Typically, I have two types of lists for myself: 1. my daily lists that are created and achieved every single day and 2. my on-going lists that are for myself but are not time pressing projects or chores that can get done when I can find the time. Amongst the phone calls and email correspondence, I had laundry and the crock pot going, I got the house cleaned and the dogs bathed. I did some organizing and other general productive items on my list. In the middle of the day, I started noticing that there are elements of my home that made me smile. They are small but smile worthy. And if you're anything like me (quite particular and OCD in many ways, tidy, clean, etc), and are living in, what seems more of a project than a home, it is important to take note of the things that you truly enjoy about the project home that you live in.


 1. A pretty and small bouquet of flowers in a mason jar on the table (even though they're roses, not my favorite)


2. All of the laundry is done :)


3. I got to spend the entire day with my Jeremy's puppy. (he's normally with Jeremy on his job sites while I'm working)


4. I have been wanting to break up the sterile look of mostly cream on the guest bed and found this couch blanket at Costco. It's perfect and I'm totally going back to get one for the couch. It's super warm and cozy.
5. The entire day was over cast and very intro-to-Fall-esque. Which inspired me to browse for sweaters. I found these at TJ Maxx. They're perfect.


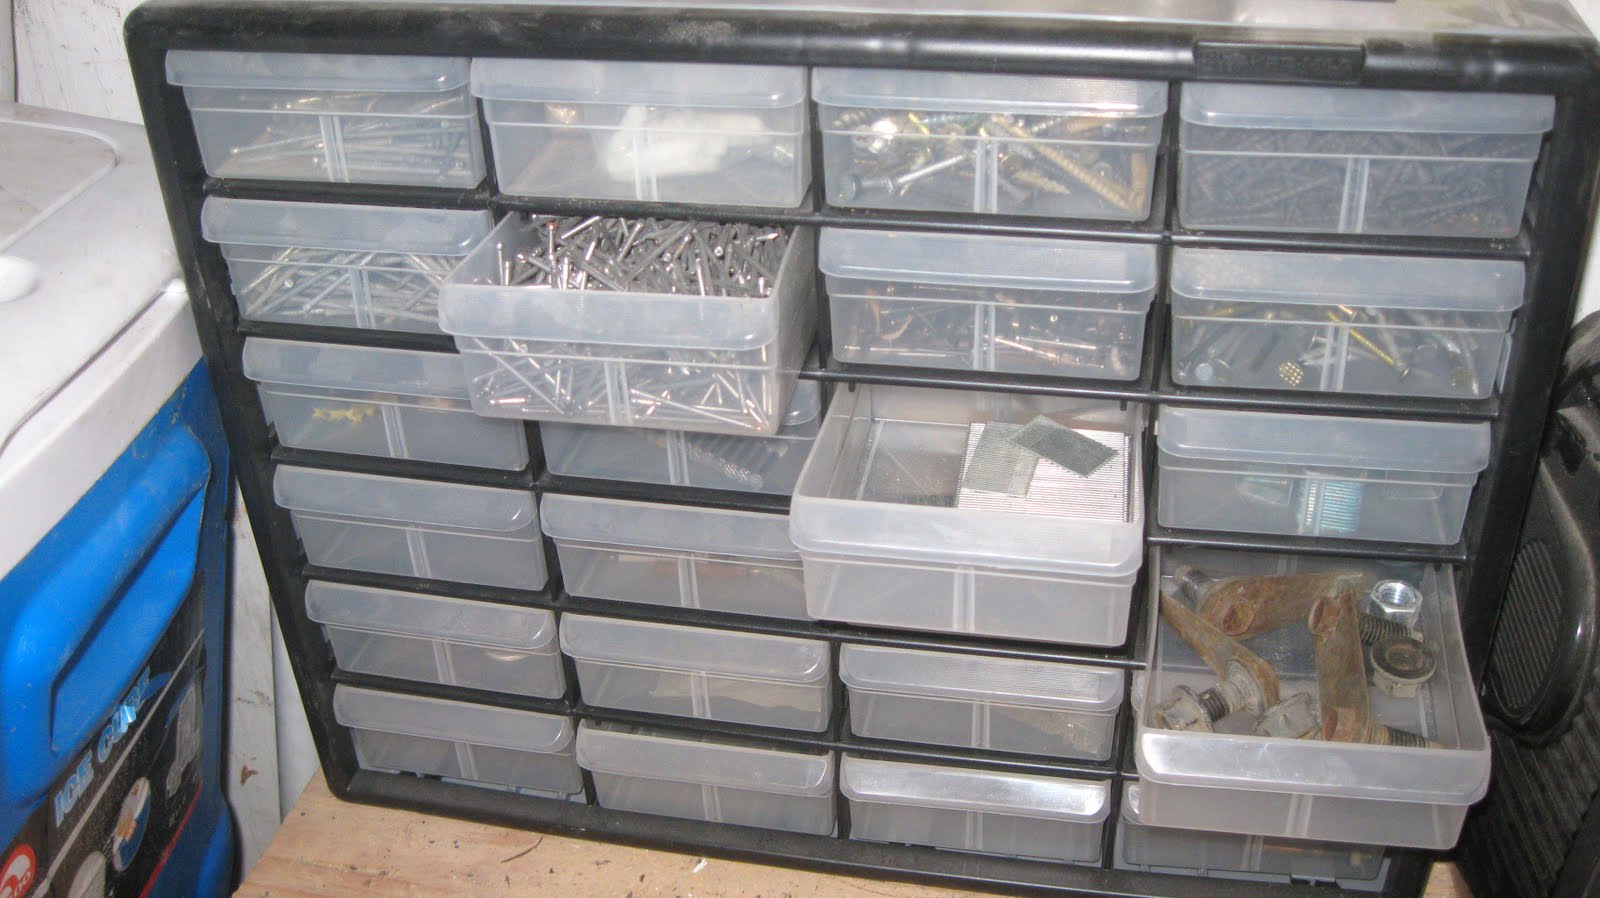
6. I, recently, found a way to organize all of my batteries and light bulbs. I can't tell you how much more enjoyable it is to reach for a replacement bulb or battery, knowing that they aren't unorganized or messy in their wrappers, but instead, in bins.


 7. As I was taking a break from the inside chores by throwing the ball around for Peter, the puppy, I noticed that our gardens and fruit trees could use some harvesting. I love eating the produce from our own yard.


8. I planted some dwarf curry and several different kinds of lavender plants in our front flower gardens and they are spreading and growing like crazy. The combination of the two are so beautiful and smell heavenly.

Weekend Demo

This weekend was full of projects, getting dirty and crossing items off of lists. I am sore but very pleased with the amount of progress that Jeremy and I made. The most progress was made with general maintenance on the front yard and with our former/current weight room future baby's room.

We: removed all door/window trim and baseboards, pulled up carpet/pad, removed old oak flooring, refastened all loose sub deck floors (which was all of them), demo closet, laid 1/2 inch ply for an underlayment in prep for new wood floors. 


Here is the room in all of it's naked hollowness. 
It is now ready for (in order):
1. New wood floors
2. New windows
3. Trim and baseboards
4. New closet system
5. New door

Hurray!

House Reno: Summer 2012 Bucket List

"Hunny, what house projects should we work on this summer? What should be our goal to finish?" ME
"Why don't we start and finish the dining room addition?" JEREMY
"Yea, that would be really nice to have done." ME

(After thinking about it for a day or two I am regretfully excited to tell you that we will NOT be doing the dining room this summer. WHAT?? Well, Jeremy and I plan to have a very work busy summer this year. Logically, I would prefer to not get into something like an addition without being able to completely finish it.)

Boo. Kind of.

So, instead, we will be finishing a lot of the projects that we have started already!

1. Finish roof (we re-roofed over a year ago and it's still not finished), fascia,  flashing, prime and paint entire house.


For reasons like this ------>


<------- And this 


2. New front door installed, framed, trimmed out.


New Door:
(Something similar)
3. Finish (ie: wood floor/windows/trim/baseboards/closet shelf system/closet doors/bedroom door/everything) future baby room.
(Obvious "before" photos)
4. New windows in the entire house
5. Possibly finishing the front porch (post columns, railing)

So, there you have it! Wish us luck!


Guest bedroom closet

ie: my mom's closet

Here is the closet before:

After:We took out the carpet and built a new closet system and I got some baskets for storage. We'll paint it after my mom leaves, more than likely. We have way too much to do, to paint it!

We are getting so close to getting everything done, I can't believe my mom will be here in about a week! We may be inhaling paint fumes once her plain lands, though...

Home made shutters

I was inspired to do these shutters after a scenic drive around Eugene and its surrounding areas. I saw similar shutters on a house that didn't match the style, but knew they would look incredible on our ranch-ish style house.

Here's a poorly documented how to:

You can see the brace's in that we attached the cedar boards to:
(extremely important for strength, you know, to withstand elements and natural disasters, etc)
Kidding. Also, for strength we used nails and wood glue.
Using 1x4 cedar fence boards we went to work:
The size of your shutters will wholly depend on how big your windows are. We measured ours to fit our window (shutter dimensions: 15x36) Each individual shutter measured 4 fence boards across with a 1/4" gap in between.
Once the diagonal piece was assembled onto the shutters, I waited for the glue to dry, primed and painted them the color that our trim will be when we re-paint the house.Office window before: After:Kitchen window before:

After:
These shutters bring excitement for so many reasons! 1. We are able to cross another thing off of our list, 2. they make the house look stinking rad and 3. by choosing the color for the shutters, we have also chosen our trim color...

KACHING!

Kitchen stools, doors and a little craft

Kitchen stools:

These were my mother-in-law's kitchen stools that we have used for years. I knew that I wanted a much more simple tall stool for our bar in our kitchen. Stools that will also go well in our kitchen-to-be, not so much our kitchen now.

And then I stumbled upon these while Jeremy and I were thrift store hopping one day for fun. (is that a strange thing to do for fun??) So at 6 dollars a piece I snatched them up! They were rough and beat up but solid wood and the simple, country look I wanted for our kitchen.

And with a lot of sanding and even more paint: viola!

They take up so much less room and I love them!

Doors:
Our guest bedroom now has a door and a door handle!

And for my craft:

I was looking for some theme appropriate decorations online to fill what is now our corner DVD shelf. After Jeremy came home with his giant tv, our corner shelf that is full of DVD's looks so cluttery. So we'll eventually be making an entertainment center for under our tv to hide the DVD's and lightly decorate the corner shelf. I found some cute african safari type animals made out of wire on the Pier 1 site with a steep price tag. I wasn't willing to pay a high price for something that I could make for free... in comes my craft:
Sooo, they are obviously not professionally done, but they're fun and will be a great addition to what I'm envisioning the shelf holding.

Jeremy's shop and our chimney


As Jeremy's work trips have become extended and more frequent, his shop has become more and more of a nightmare. Finding a paint brush became impossible without a phone call in order for him to help navigate me through the mess and arrive at where he hopefully left one last. In addition and most importantly, the lack of organization was increasing the amount of time it took for him to get out the door and start his day. So, organizing the mess and sorting through his shop went on our list. I'm kicking myself for not taking some before pictures but I'm also glad to not possibly embarrass ourselves with how bad it got!

So here's his shop completely organized with our camping gear/hiking/floating gear on the left and stacks of lumber on the right. Everything is super easy to get to and he's now able to see what lumber he has on hand so he's not buying doubles (I've said this before but lack of organization can seriously get expensive if you're constantly buying doubles of something you already had but couldn't find)
We got these shelves to stack his plumbing bins/painting/electrical/grout and tile work bins, his many bags of different colored grout and mortar, tools, etc so he's able to clearly see what he has and where it is and grab it and go. There is plenty of shelf space left for any tools that are typically kept in his truck to be stored in the shop instead.


This was my biggest contribution. Jeremy had bags of screws and nails and bolts, you name it all over. Not to mention the loose nails/etc that were scattered on the floor and in every nook and cranny of his work truck and shop. I will eventually label everything. But for now, row by row, he has organized hardware.
Our poor ceilings have taken a serious beating. Partly due to a desperately needed new roof, which we thankfully took care of last fall. Also partly due to a poorly sealed chimney. So, before we repaired the ceilings, we had to take care of the root of the problem on the roof. Again, no before picture, but I'm happy to say that our chimney is now sealed and mortared.


CHECK, CHECK!

Revised and updated "my mom is coming" house to-do list...

...and probably the last list for awhile.

For those of you who don't know, Jeremy has been gone all but 8 days a month for the past 7 months and is just now home for good as of a week ago. It's been so hard for him to catch up on sleep and bids for customers while working and trying to knock some of these to-do items off of our list. I'm a big help but not when he takes off with all of the tools and when the heavy lifting is too much for my girly muscles to bear. In any normal circumstance I would be one-hundred-percent ok with casually getting these small things done, but in three weeks my mom is coming from Woodstock, GA. A visit that hasn't happened in three years. Yup, I haven't seen my Southern momma in three years! Since we got married, actually. It's a little unbelievable, however exciting and I'm anxious to get everything done with haste. I have promised Jeremy that we will be putting any future lists on the back burner if we're able to get everything done before August 10th.

Without further ado, here's our new and final list:

Weight Room:
-texture/paint/new light fixture
-fit all baby items in baby closet (they are accumulating elsewhere and it's driving me nuts)

Living Room:
-Touch up grout
-Build new entertainment center (seem unnecessary? Sort of, but J brought home a giant new tv and it is throwing the whole living room off!)
-Re-finish globe stand

Master:
-Trim around big window
-Matching table lamps for bed side tables

Office:
-Finish slate

Bathroom:
-Make sconces (stay tuned, these are going to be awesome!)
-Shelf
-Bathroom hardware accessories

Kitchen:
-Finish stools

J's Shop:
-Put up shelves/organize

Guest Bedroom:
-Door/door handle
-New closet built
-Wood blinds installed

Outside:
-Pressure wash/yard maintenance
-Mother-in-laws tarp building emptied and moved to the back yard
-Burn piles (I'm not sure if we can legally knock this one off of the list, we are way past burning season)
-Vent well and walk way by fountain
-Shutters
-Pond/Rocks
-Fountain
-Plants by fountain
-Edge back lawn
-Seal/refinish chimney

So, there you have it. Our massive list. I have thoughtfully -insert cheeky grin here- planned several fun outings for us this summer to reward our hard working bodies. Hopefully we can get these things done and I'm able to relax and enjoy my mom's company when she's here. Hurray for lists!!

Benches and Pillows

I have read about 3 or 4 new blog entries today from different people, all of which had to do with pillows in some form or another. I am aware that I'm not original in the idea of making my own pillows (my last adventure in pillow making was basically completely done by Jeremy's grandmother, bless her heart!). However, I am very happy with how mine turned out. For another great idea for home made pillows check out my friend, Dawn's blog. She's wonderful.

Firstly, (is that a word?) I had Jeremy build 2 benches. They're identically built but the one that goes in our room was painted black and the entry way bench was painted cream (the same cream as the letters on the wooden family sign) and aged with sand paper and stain.

Secondly (which I know is a word!) I got some great baskets for the hallway bench off of amazon (still looking for baskets for the bedroom bench, I've looked everywhere... hook a sister up if you have ideas)

Thirdly, I ordered some burlap from the Online Fabric Store. I got a couple of sacks (primarily got the sacks for the two finished sides that will eliminate just that much more sewing) in the natural color and a couple of yards of dark brown burlap.

Here's my pillow sewing journey:
:::by hand I might add:::
(I don't own a sewing machine... I also don't know how to use one!)

1. I got pillow forms from the craft store and put one inside the sack, measured and cut around it. Since the sack had sides that were finished I decided to take advantage of them! Also, I found when sewing fabric like burlap you must use a thick and sturdy thread. For the pillows in the entry way I used thread that was almost yarn, the ones in the bedroom I used black upholstery thread.

2. I sewed up the third side (yes this isn't the sack burlap, I wasn't the best documenter of this project) When I sew by hand like this, I do one run with the stitches as similar in width and as straight as possible and then back stitch (I literally just googled that term).
3. Don't be afraid to ask for help

4. After the third side is sewn up, shove your pillow form inside what you've sewn5. Fold the remaining fabric inside the pillow, can you tell what I mean by looking at the picture?
6. Here's a finished side
7. From there you can add whatever "accessories" you'd like to jazz up your pillows. For some of my pillows, I added buttons and I also added an "S" to one of our bedroom pillows. Here's how I did that part.
8. I printed and cut out an "s" and placed it on the burlap. I used fabric paint and traced around the letter. Once the paint was fairly dry, I pried the "s" from the fabric and filled it in with more fabric paint.
Fabric paint takes about 4 hours to dry, so after waiting about 2 of those 4 I got impatient and used a blow dryer. Worked like a charm! Then, I cut the letter out and stitched it onto the pillow, and for pure decoration I stitched around the letter. I clearly have a quality camera, the clarity in the picture is the tell tale sign.. try to not let your jealousy show... ha!

Grand Finale!
Bedroom:

Entry way:


Besides the fact that my fingers are in pain from a lack of using a thimble I am stoked about the way they turned out!