Showing posts with label home made. Show all posts

Projects: chevron inspired and nesting baskets

 Hello all! I realize that my blogging has turned into a consistent inconsistency. I do have several projects and vacations, etc to share. Be prepared, this might be a bomb of blog posts kind of day or two.

Until December, we had nothing to hide the wires hanging from the TV, and that bugged me. And, until recently we had nothing around the TV. Just a blank wall. With a big TV. That, also, bugged me. I had different intentions for the space around the TV then what we ended up with but as with most DIY projects, I switched gears mid project because: a. I can and b. my original thought was not working once it came to life.

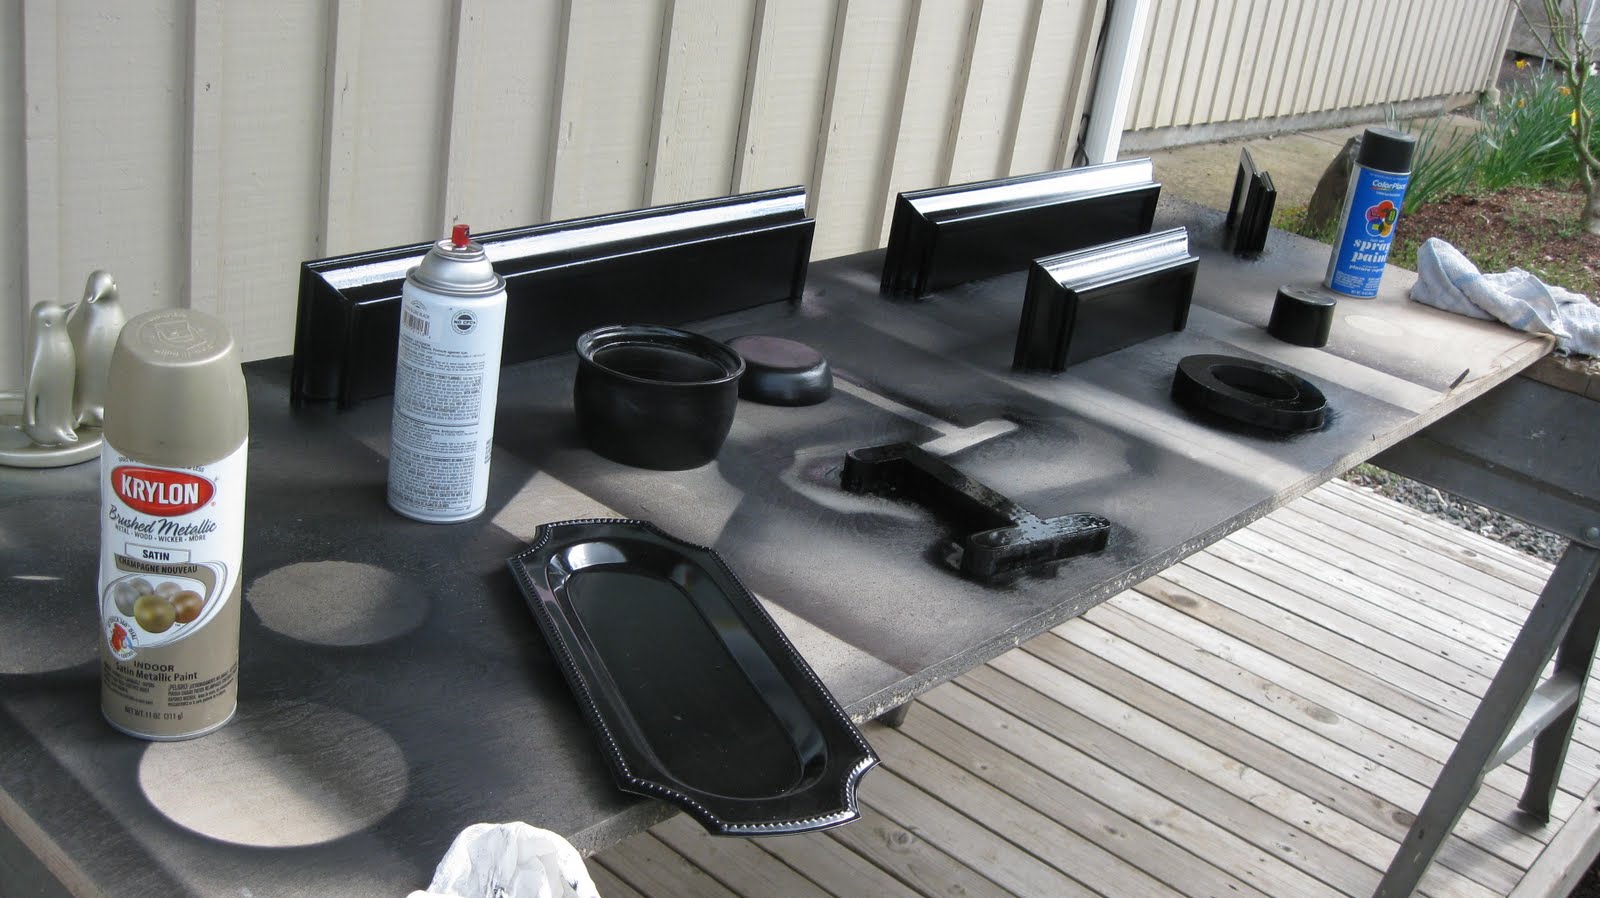
For above the TV, Jeremy and I built a large 64" x 11" Chevron inspired wall hanging out of Cedar 1x4's and used old stain from countless past projects alternating boards or even splitting one board with a lighter stain on one side and darker on the other. The trick was to be as random and non uniform as possible. Even with the sanding.

To the right and the left of the TV needed something also. I have been looking forward to pulling the trigger on some non-authentic African style nesting baskets off of Amazon (shameful, I know... there are many wonderful websites that sell authentic African woven baskets by men and women in Uganda and Kenya... they were just a little spendier than what I was looking to spend) UNTIL! I found this link on Pinterest for home made nesting baskets.

The gals at Two Girls Being Crafty explain this process very well with step by step instructions. The only thing that I would add is make sure your patience level is at an all time high because the process of Mod Podge-ing and swirling the hemp (or whatever material you use) can be quite frustrating. Be liberal with the Mod Podge (it dries clear). And don't remove the bowl off of the bowl mold for a day or two, to make sure that it's totally dry and doesn't lose it's shape. I also sprayed mine with a clear sealant.

And finally, below is the product of the craftiness. I love how the snake plants and white elephants subtly add to the African theme in our living room.


Juice

I need to look back at how long this health kick has lasted but much longer than ever before! I can't believe how motivated I am to continue with a consistently healthy lifestyle.

Lately, I've been making all of our own juice (minus orange, home made is a gigantic pain in the rear!). I could really use a juicer but for now my blender and a straining sifter work just fine. My most recent and favorite juice is apple, strawberry and lemon. I don't add anything but fruit, coconut water and purified water. It's so yummy and a great way to control the amount of sugar you ingest.

A Grant wedding project train

When Nic and Alli were beginning their wedding plans, I was asked to be a part of the decorations committee which consisted of me and another bridesmaid (another one of 10 I might add :). We planned and plotted and schemed up the best way to make her idea of the perfect wedding come to life in an economical way... I think we pulled it off:
There was a mixture of natural, store bought, crafted, painted, glued, dyed, sewed, pinned and chopped all done in beautiful Fall colors (orange, green and brown).

Here's a little bit of the process:

I went to Grandma's farm to pick some pine cones out of her pine trees. We painted them brown and added a little bit of metallic.
Next, I dyed some doilies with coffee (I put ground coffee into a pouch I made out of a coffee filter) and dark plain lipton tea and boiled it altogether until the doilies started changing color.
I also made the boys' boutonnieres. Here's what I started with:
Make sure the flowers you choose are small and gather-able. Glue the ends with hot glue (you will burn your fingers... sorry)
It's easiest if you have something to bind or wind them with. I used a leaf from the flower bundle
Use floral wire to bind the stems.
I made the place settings for the head table and also for the family tables. I just printed their names on colored card stock and matted them, cut them out and hot glued them onto skewers cut in half. I stabbed the skewers into fruit once they were on the tables
Since every table had a similar but not identical center piece, I was able to do some random decorations just in case there was space to fill.
I also decorated hurricane vases with ribbon, left over flowers, wooden G's, had J cut some tree limbs into tea light candle holders to place around the hurricane center pieces. I brought lots of mason jars, candles, moss, limes, tangerines and extra vases.
I love, love me a wedding project!

I saw the sign... And then I hung it on the wall

My family sign has finally been hung on the wall and the coat hooks have also graced the wall with their presence. Here's the grand finale (minus the bench):


Here's a shot of the sign on the wall with the slate entry.

And the bench, once it's made, will go right under the sign. It'll measure about 18 inches high and will be the length of the sign I made. I'm pretty stoked about it!

Bedroom Decor, Check!

My poor bedroom has been the object of neglect for two years. We've painted it, built a closet in it, half-heartedly hung some below parr decorations in it, along with some wood blinds to replace the drapes that came with the house. Beyond that, nothing. How sad! Thankfully I included our bedroom in our checklist and went to work to decorate the poor thing. Here's the transformation process in action:

We started with this... (don't judge)

I designed an eclectic wall mural, of sorts, collection of things-whatever you want to call it- that included things we loved. I designed it to wrap from that window on the left to a window on the right. I started by repurposing some things, painting things, assembling, making from scratch, etc. to get a large pool of things to pull from in the making of this design.

Here are the letters l-o-v-e that I stenciled onto wood from our scrap wood pile. Jeremy cut them out and I painted them

I painted frames that were for art that used to go in our old office. They were actually pictures that were in our "Goodwill pile." I took out the old pictures, painted the frames and popped in some unframed wedding pictures that have been stored for years.
Here is the start of my collection of things I had planned to paint and use in the design

Here are some of the decorations getting their either black or gold spray paint bath

Once everything was painted/repurposed/tinkered with, I arranged them on the floor to make sure everything would fit in the space I had planned for them on the wall. To make the hanging easy I just measured and drew guidelines on the wall so I knew exactly how high and how low the design could go.
And here's what it looks like on the wall:
Other gold/black decorations in the room:
Before:After:I was also able to check the "add height to the corner" item off of our list by moving those candle sticks from our living room into our room.

This whole project grand total: free.

We used things that we had and painted them with paint that we had. Gotta love that!


Cielings and Signs

Remember this?
I set myself up to fix this mess, this morning
After:
Check!

Next I made the sign for this hall/entry way. The wall on the right is where it will go.

I started with 3 pieces of wood that were the same width and cut them all to the same length and sanded them down.
I painted them all the same color of blue, a color I found in our extra paint collection and also was a perfect blue that picked up the blue in our slate entry. Once the paint was dry, I flipped the boards over to tape them together. I did that so when I painted letters on them they wouldn't slip around.
Next, I picked a font/size I loved and printed them out. I cut, roughly, (no need to be perfect here) around them and taped them in order to the painted boards. Once they are secured, I traced on the letters which caused an imprint in the wood once I removed the paper.
Next, I picked a creamy color to paint in the letters and went to work. Here's the almost finished product. I'm not completely sure how I want to hang it yet.
Check!!

Save that money honey

In the past months, I've significantly added to my list of blogs that I've been following, and have found a trend of money-saver lifestyle choice tips in multiple blog entries by multiple bloggers. I thought I would add to that trend with our own frugal abilities. Now, I am by no means a poster child for being frugal in all things. I have a tendency to throw an occasional tantrum when I can't get something I want (imagine a grown woman in the middle of Banana Republic, picking out a dress, trying it on, and her husband admiring what he sees but with a stern voice of reason says "honey, we can't spend what that costs right now" and that same grown woman refusing to take the dress off until she gets what she wants. Yea, that happened. And yea, bless his heart, he gave in.) But times are tough and we are ready for the challenge of spending less, putting our heads together and doing a little for the environment while we're at it.

First thing's first:
Buy. in. bulk
We buy a ton of our non perishable items in bulk. The only beef I have with this is the waste of the wrappers. Which leads me to my next money saver tip..garbage.
We used to spend 50-100 dollars on garbage/recycle curb side pick up per month. We live in the country so we can get away with this, but we now have about 8 or so garbage cans that we take to the dump when they're full. The dump is about 10 minutes away and the cans get full every couple of months or so. When it's time for the dump trip, we load up our hound dog and leave within 15 minutes only spending about 14 dollars to dump our garbage. Yup. 14 bucks. How?


We compost all of our "food garbage" and we also are very good recyclers. So all of our plastic/paper/card board/bottles/glass garbage is free. Everything else amounts to 14 dollars bi-monthly.
Next, always store food in plastic containers. It keeps your food fresher and they are much more visible so you know what you have. We also rarely use ziplocs or disposable storage. When we do use them it's for travel and they are always reused.This is our travel drawer in our bathroom. It's not pretty. But it is sure useful. We keep our travel toiletries and ziplocs in here. We often throw our face wash/astringent/whatever else we think will leak on our luggage in a ziploc. Also, we rarely use paper towels for cleaning. We more often than not will use cleaning towels that we can just wash and reuse. I also hang dry almost all of my clothes. I've never considered the money I save in electricity sans dryer for my portion of our laundry but I'm sure it helps in a little way. It's also MUCH better for your clothes.We also buy things that are recycled as much as possible. For example, for school I use notebooks-duh-. Non-recycled notebooks can cost up to 10 or 15 dollars! Crazy, right? These recycled notebooks were .79 cents. Reused items are also a definite money saver. We often will cruise our local recycling center for material for new projects.Another tip is to keep your things neatly organized. Yes I do this in part to satisfy my OCD tendencies but it's also a money saver. I find that if my things are neat and visible that I'm less likely to buy doubles of things. There are certainly things in the house that I do not need multiples of.
This is my bare and fairly unorganized and tiny pantry. It's bare because we are undergoing a challenge. A weird one but nevertheless we're taking it on. We are cooking until we don't have any more food to cook. We are literally using every ingredient we have in our house before we buy anything else. A world traveling friend of mine said that she would often empty her house of basically every ingredient before she would grocery shop. I was shocked when she brought that up, thinking how impossible this would be. Now, I'm challenged to do it. It's a great way to get rid of things that may be nearing their expiration date. But it's also (remember I'm a teence OCD) a great opportunity to get things CLEANED! The little nook and crannies of my pantry, spice cupboards and refrigerator are getting emptier and emptier therefore nearing a cleaning spree! Excuse my odd excitement.Another tip is to eliminate as many monthly expenses as possible. One expense that Jeremy and I have eliminated is our gym membership. Our membership was somewhere in neighborhood of 100 dollars a month. Now, we have our own gym-granted it's not state of the art, nor do we have the luxury of a trainer. But this set sure get's the job done! We have the machine that can be switched around to do just about any workout, the ab bench to the left, a giant mirror for squats/lunges/cleans, free weights and a few yoga odds and ends.


The next tip is something that my husband is much better at than I am. Keep-Everything. I'm trying to reign in the hoarder side of this money saving tip and meet in the middle by keeping only things that have a purpose in the near future. This wood for example is a great thing to add to the keeper pile. In fact, most of our "left over" wood is what we make a lot of our DIY projects with.

All of these furniture pieces at our house were made with "scrap" wood

These are our bed side tables for our guest bedroom.
Our pet python ( i know, but he's cool) benefited from a corner kitchen cabinet that Jeremy tore out of a house he was working on and built the book shelf under neath.
This is one of 2 bed side tables in our master bedroom.
This is our corner DVD shelf.
Obviously it's often times not as economical to build your own furniture. But in this case, since we were using left over material which had already paid for itself, we ended up with twice the project with one set of material. On that note though, cruise the second hand stores or craigslist for used things that simply need some updating or re-purposing to get just look you want for the purpose you need it for.

Ok, that's all I have for you for now. I hope some of this gave you a few ideas on how to save where the saving is easy. Feel free to fill me in on any money saving ideas you use!